Sunday 23 December 2012

S3 MOD

The first thing I ask myself is why? Why flash a new phone, running the latest OS, voiding the warranty and risk bricking it... Two, well, three reasons really.

The first reason; I don't like the feel of the Samsung gumpf on top of JellyBean; I'd had the phone for a month, but I still wasn't getting on with the Samsung layer. I guess I was so used to the LAF of my Nexus 7, which after 6 months, I'm still loving btw.

The second reason is, the battery life on the S3 is far worse than I expected. I'd go a day, without doing much on the phone, and I'd burn through the entire battery - the top two offenders being the screen and the OS. I'd had my HTC Desire for ages, as soon as it first came out in fact. I was getting used to having it on charge pretty much any time I sat down at my desk and was thinking, hoping that a new device wouldn't require charging all the time. The Nexus 7 battery life is awesome; I'd have to be playing a graphic intensive game for an entire day to get through a full battery charge.

The third reason; just because, I'm a geek, that's what geeks do.

So after flashing my S3 from stock to CM10, I had a couple of minor issues.

First of all, the Ubuntu walkthrough didn't work for me, so I had to go down the Windows root, sorry route. (Good, concise, clear tutorial; thanks @galaxys3root)

Secondly of all, the flashing of clockworkmod didn't seem to stick, though this seemed to remedy itself on the 3rd flash. I'm not sure why it stuck on the 3rd attempt tbh. I used Odin to root the phone, which worked first time. I also used Odin to replace Android System Recovery with CWM, the settings were the same each time flashed CWM, and it was only the 3rd time that it stuck. The settings I used were pretty much default but I deselected auto-reboot; so ensure all of the Options are deselected - this is so the phone doesn't reboot straight away and you can pull the battery.

Third of all, there was an issue was with the external SD card. CWM couldn't see it. The card would not format in the phone. None of my Ubuntu machines recognised the card, and Windows wanted to reformat it. "You need to format the disk in drive E: before you can use it."

I got a bit #LazyWeb about this and asked about it on the cyanogenmod forum and on android.stackexchange but didn't get too much back tbh.

Here's a tip for you if you still have data on there that you want to retrieve. On a Windows box you can run:

Start -> cmd -> chkdsk e: /f

Windows will then recognised it, and pop up the AutoPlay applet. You can then back up any data that you may have missed prior to flashing the phone.

I formatted the card as ExtFat. It reports 59.4GB even though it's a 64GB card. That didn't work at and my progress bar was still at 0%

Let's try formatting on Ubuntu... Dang! Ubuntu doesn't have support for ExFat; you'll need to

sudo add-apt-repository ppa:relan/exfat
sudo apt-get update && sudo apt-get install exfat-utils fuse-exfat


Let's have a look at the partitioning. You'll need gparted for this:

sudo apt-get update
sudo apt-get install gparted


Pop the card into the adapter.
Start up gparted.
unmount the card.
Format as ext4
Pop it back into the phone.

I didn't get an error this time and the phone shows the message that it is preparing the card, but it doesn't mount.
You still get the same error through CWM too.

Pop the card into the adapter.
Start up gparted.
unmount the card.
Format as ntfs
Pop it back into the phone.

I didn't get an error but the phone still shows the message that it is preparing the card, but doesn't mount

Ah, well. Looks like I'm going to have to settle for 32GB.

Pop the card back into the adapter.
Start up gparted.
unmount the card.
Format as fat32; gparted show the partition as 29.23GB.
Pop it back into the phone.
I didn't get an error. Wait... Wait... Wait... It's mounted!
Go to ICS SD Binder set the mapping to the desired path, and hit save and reboot.
When the phone restarts, you'll see this:
Total space 59.43GB
Available space 59.43GB

I didn't really expect that tbh. It looks like it has taken the 29.23GB partition and automagically repartitioned it as 59.43GB. Awesome!

It's still very early days, but CM10 is looking good so far.

The biggest two battery offenders are still the screen and the OS. I have some spare batteries on order, and with the Samsung gumpf now off my phone, the battery is my only gripe with the S3.

I'm going to end with a question. What does the Samsung layer give that I can't get from CM10 and the app store?

For example: AllShare... I've replaced with BubbleUPnP

Useful Links:

Google Apps

CM10 Updater App
Friday 9 November 2012

Integrating with Quality Centre

I've recently had to go elbow deep to resolve an issue where a product developed by a company does not play well with a second product developed by the same company via a plugin, also developed by the same company.

As is my way, I'm posting the issue and the solution in a bid to reduce the average amount of pain felt.

WARNING: HP Quality Center Plugin exception
com4j.ComException: 800413ed (Unknown error) : Parameter Type is Invalid : .\invoke.cpp:517

The fix for this turned out to be replacing the empty String with a com4j.Variant.Type.VT_NULL
import com4j.Variant;

Then replace
Com4jObject bugObject = bugFactory.addItem("");
With
Com4jObject bugObject = bugFactory.addItem(new Variant(Variant.Type.VT_NULL));

Another tip is formatting the date.
WARNING: HP Quality Center Plugin exception
com4j.ComException: 80040519 (Unknown error) : Invalid date field value. : .\invoke.cpp:517

DateFormat dateFormat = new SimpleDateFormat("dd/MM/yy");
Date date = new Date();
bug.field("BG_DETECTION_DATE", dateFormat.format(date));

The final tip is ensuring you use a user that exists on the system.
WARNING: HP Quality Center Plugin exception
com4j.ComException: 800403ff (Unknown error) : Dookie is not in the users list : .\invoke.cpp:517

bug.field("BG_DETECTED_BY", "this has to be a valid user");

It's not all good news. For the life of me I couldn't find a solution to the this one and didn't want to get too deeply into the whole DLL thing. No matter how I specified the DLL; jvm params, properties et al of how I registered them or indeed which version I used, I could not overcome the following error. If oyu have a fix, let me know please. The only way to circumnavigate it was to downgrade from a 64-bit to a 32-bit version of the application. So I can only assume there is an issue with com4j-amd64.dll or com4j-x64.dll
com4j.ExecutionException: com4j.ComException: 80040154 CoCreateInstance failed : Class not registered : .\com4j.cpp:153

Friday 27 July 2012

CouchBase: Permission denied

It's 1400hrs, I have an hour or so to kill, so I going take some blog notes as I play with CouchBase. I must be having one of the those weeks where nothing is going to go well; thankfully we're almost at the end of the week.

I'm finally up and running with an instance of CouchBase (though I had to change OS and grab the latest build), and I can see buckets and documents.  Yay!  The next logical step for me is to connect programmatically, and maybe create a prototype app.

Let's watch the video as it will only take 5 minutes. I love the fact this it titled "Get Started in 5 Minutes" but the video is 11 minutes long...

To save you some time, download the driver and add it to your classpath; saved you 10 minutes and 32 seconds.

I believe a 'Hello, World!' program should demonstrate the simplest thing possible, so I just wanted to connect to the instance.

public static void main(String args[]) 
 throws Exception {

 URI server = new URI("http://192.168.0.8:8091/pools");
 ArrayList servers = new ArrayList();
 servers.add(server);
        
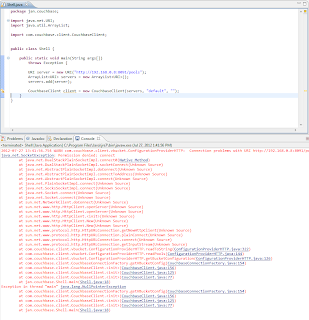
 CouchbaseClient client = new CouchbaseClient(servers, "default", "");
}


It looks to be failing due to a "Permission denied" exception.  FFS!  I'm starting to get slightly miffed. Running a quick wget indicates there should be no such permission issues.


Ah, ha!  Fortunately I've seen this before, it just took me moment for the old brain cells to remember. To fix the issue you need to add the follow as a VM param:
-Djava.net.preferIPv4Stack=true

Now that I can finally connect, let's get the KVPs from a bucket.   It looks like TAP is the way to go.

TapClient tc = new TapClient(servers, "default", "");
tc.tapDump("some id here");

tapDump returns a TapStream, but I can't find the TapStream dependency. This dude managed to find it, but looks like he may have other issues.

I'm getting bored, and my head is getting sore with all this brick wall hitting.  I know it's early, but I fancy a nice cold Never Mind The Anabolics, it's in a bottle so I don't have to worry about tap streams...

Oh, and it looks like my issue with installing on Win7 64-bit has been around a while.

Thursday 26 July 2012

CouchBase: SIMPLE

So, yesterday we had the CouchBase guys in the office, I think it was some kind of retaliatory strike to me having brought in the MongoDB guys a few weeks prior.

In the interest of being able to form a balanced view I thought I'd test out the "SIMPLE" part of the CouchBase "SIMPLE, FAST, ELASTIC" tag line by downloading, installing, creating and query some data. I like simple so this looks like it was made for me.

It takes me only a minute or so to update the version of MongoDB I run on my Ubuntu servers; it is very simple, but I've done it few times, so some of the ease of update is simply down to practice. This isn't really going to be a 100% fair and direct comparison if I'm completely honest. However, for the purposes of comparison we can use a quick guide to downloading, installing, creating and query some data. All the information you need is on one, simple page.

MongDB
Download: 27 seconds
Unzip package: 4 seconds
Create data directory: 9 seconds
Start server: 19 seconds
Start shell: 16 seconds
Create a document: 16 seconds
Query collection: 8 seconds

Total time: About 2 minutes.

CouchBase
Download: 2 minutes, 31 seconds
Install: (via the Wizard) 2 minutes 52 seconds + 3 minutes (Had to run this a seconds time as I was shown a 1618 error saying install was already in progress, which it wasn't. Also, after the wizard said it had finished the install there was no CouchBase directory in the default location and a browser didn't pop up pointing to the Admin UI, as per the install guide)


Configure server: 1 minute. I wasn't sure how much RAM I should be dedicating to CouchBase, nor was I completely sure which bucket type I should be choosing. The other niggly things with the install were the fact I had to complete the product registration before I could complete the configuration.

I'm not sure what it's doing here tbh...


Start shell: No time recorded. I couldn't see a quick start, simple, single guide anywhere. I had to google "couchbase quick start guide" which initially took me to a page where I could request quotes around pricing and duration. Gave up after 10 minutes. Looks like I may have to do this via the Admin UI.

Insert data: No time recorded. As I couldn't find how to connect to the server via a shell, I hunted around and found this posting; it looks simple. I couldn't find the 'Document button' that was being referred to though. I hunted around for another 15-20 minutes until I got frustrated and bored. I gave up.


Total time: DNQ

I'm afraid CouchBase has failed my definition of simple. Maybe they use a different dictionary, or maybe I'm just too simple. If anyone can point me towards a one-pager, simple, 101, 'get started quickly guide', then I'd appreciate it.

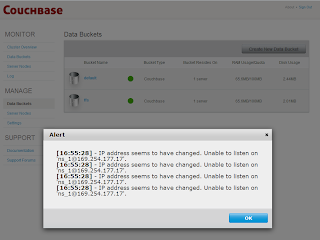
Let's give it another. So many people are using this that this must be a one off. So, I uninstall and restart my box. Then install afresh. I continue through the default settings. This time when I get to the Console I am met with this...


Not only can I not create a Document, I can barely use the Admin UI because of the modal alert that keeps popping up... FFS!

To get over this I do the following:
cd %COUCHBASE_HOME%\Server\bin
service_stop.bat
service_unregister.bat
Edit the script service_register.bat
Replace NS_NAME=ns_1@%IP_ADDR% with the 127.0.0.1.
service_register.bat
service_start.bat

Final effort. I uninstalled yet again and downloaded the latest version 2.0.0-dev-preview-4 and ran through the install process. Everything came unstuck when the wizard hit the 'Computing space requirements'; we basically hung at this stage. I wasn't able to cancel the install, so I had to kill the process. I tried once more and one last time - same result. There is a saying, 'If at first you don't succeed, try once more and give up.


UPDATE: 2012 Olympic Opening Day
$wget http://packages.couchbase.com/builds/1495/couchbase-server-community_x86_64_2.0.0-1495-rel.deb
$sudo dpkg -i couchbase-server-community_x86_64_2.0.0-1495-rel.deb

dependency error

$sudo apt-get install libssl0.9.8
$sudo dpkg -i couchbase-server-community_x86_64_2.0.0-1495-rel.deb


Now I can hit the Admin UI. I tap up 192.168.0.8:8091
We're getting there; I want to install some samples; I chose the beer sample, no surprise really. I was thrown back an error.


I hit next again and it said the sample was already installed. OK. So I unseleted the sample and hit next again. Success. So, semi-SIMPLE, it took less than 5 minutes; all I had to do was be careful about my choice of OS and grab the very latest build (-;


Thanks to Frank Weigel who pointed me at the latest build.

Initial thoughts are:
  1. it's weird not having the shell and doing everything via a web UI
  2. from the brief look at the beer sample, it looks to my uneducated eye that we are defining the functions by_key_value, by_location and brewery_beers in an almost utility helper class document.

Now may the time to go and find some 101 documentation (-;

Thursday 19 July 2012

shell/mongo.js:91


Today I found some time to play with the new MongoDB aggregation framework.  It's not an official, stable release yet, but I'm not thinking about putting it into production just yet.

I wanted to keep the existing instance on MongoDB intact, so I installed it in it's own directory and created a new data directory to mirror this need.  These are the exact steps, if you're interested.

$wget http://www.mongodb.org/dr/fastdl.mongodb.org/linux/mongodb-linux-x86_64-2.1.2.tgz/download
$mv download mongodb-linux-x86_64-2.1.2.tgz
$tar -zxvf mongodb-linux-x86_64-2.1.2.tgz
$sudo mkdir -p /usr/lib/mongodb/2.1.2
$sudo mv mongodb-linux-x86_64-2.1.2/* /usr/lib/mongodb/2.1.2/
$rm -r mongodb-linux-x86_64-2.1.2
$sudo mkdir -p /data/db-2.1.2
$sudo chown `id -un` /data/db-2.1.2
$/usr/lib/mongodb/2.1.2/bin/mongod --dbpath /data/db-2.1.2 --logpath /data/db-2.1.2/mongod.log

Now crack open a new terminal so you can connect.

$cd /usr/lib/mongodb/2.1.2/bin
$./mongo
MongoDB shell version: 2.1.2
connecting to: test
Thu Jul 19 11:40:14 Error: couldn't connect to server 127.0.0.1:27017 src/mongo/ shell/mongo.js:91
exception: connect failed

Oh dear.  But this shows mongod is running:

$ps -ef | grep mongod
/usr/lib/mongodb/2.1.2/bin/mongod --dbpath /data/db-2.1.2 --logpath /data/db-2.1.2/mongod.log

What does the log say?

$less /data/db-2.1.2/mongod.log

...
Thu Jul 19 11:40:35 [initandlisten] waiting for connections on port 27017
...

Hmmm.  Let's try again.

$cd /usr/lib/mongodb/2.1.2/bin
$./mongo

Hmmm, now it's connecting.  Well, I'm off to play with the aggregation framework now and I'll check this anomaly later.

The time now is 1625hrs and it looks like 2.2.0-rc0 has just been released.  Let's give that a go.

$wget http://www.mongodb.org/dr/fastdl.mongodb.org/linux/mongodb-linux-x86_64-2.2.0-rc0.tgz/download
$mv download mongodb-linux-x86_64-2.2.0-rc0.tgz
$tar -zxvf mongodb-linux-x86_64-2.2.0-rc0.tgz
$sudo mkdir -p /usr/lib/mongodb/2.2.0-rc0
$sudo mv mongodb-linux-x86_64-2.2.0-rc0/* /usr/lib/mongodb/2.2.0-rc0/
$rm -r mongodb-linux-x86_64-2.2.0-rc0
$sudo mkdir -p /data/db-2.2.0-rc0
$sudo chown `id -un` /data/db-2.2.0-rc0
$/usr/lib/mongodb/2.2.0-rc0/bin/mongod --dbpath /data/db-2.2.0-rc0 --logpath /data/db-2.2.0-rc0/mongod.log

Crack open a new terminal so you can connect.

$cd /usr/lib/mongodb/2.2.0-rc0/bin
$./mongo
MongoDB shell version: 2.2.0-rc0
connecting to: test
Thu Jul 19 16:33:41 Error: couldn't connect to server 127.0.0.1:27017 src/mongo/shell/mongo.js:91
exception: connect failed

Is it running?

$ps -ef | grep mongod
/usr/lib/mongodb/2.2.0-rc0/bin/mongod --dbpath /data/db-2.2.0-rc0 --logpath /data/db-2.2.0-rc0/mongod.log

Yes, it is.  Bugger, I can't connect.  Let's take a look at the log again.

$less /data/db-2.2.0-rc0/mongod.log

...
Thu Jul 19 16:33:29 [initandlisten] journal dir=/data/db-2.2.0-rc0/journal
Thu Jul 19 16:33:29 [initandlisten] recover : no journal files present, no recovery needed
Thu Jul 19 16:33:31 [initandlisten] preallocateIsFaster=true 31.64
Thu Jul 19 16:33:33 [initandlisten] preallocateIsFaster=true 30.5
Thu Jul 19 16:33:37 [initandlisten] preallocateIsFaster=true 30.52
Thu Jul 19 16:33:37 [initandlisten] preallocateIsFaster check took 8.333 secs
Thu Jul 19 16:33:37 [initandlisten] preallocating a journal file /data/db-2.2.0-rc0/journal/prealloc.0
Thu Jul 19 16:33:40 [initandlisten]             304087040/1073741824    28%
Thu Jul 19 16:33:43 [initandlisten]             482344960/1073741824    44%
Thu Jul 19 16:33:46 [initandlisten]             650117120/1073741824    60%
Thu Jul 19 16:33:49 [initandlisten]             817889280/1073741824    76%
Thu Jul 19 16:33:52 [initandlisten]             985661440/1073741824    91%
Thu Jul 19 16:33:56 [initandlisten] preallocating a journal file /data/db-2.2.0-rc0/journal/prealloc.1
Thu Jul 19 16:33:59 [initandlisten]             272629760/1073741824    25%
Thu Jul 19 16:34:02 [initandlisten]             398458880/1073741824    37%
Thu Jul 19 16:34:05 [initandlisten]             555745280/1073741824    51%
Thu Jul 19 16:34:08 [initandlisten]             723517440/1073741824    67%
Thu Jul 19 16:34:11 [initandlisten]             912261120/1073741824    84%
Thu Jul 19 16:34:17 [initandlisten] preallocating a journal file /data/db-2.2.0-rc0/journal/prealloc.2
Thu Jul 19 16:34:20 [initandlisten]             304087040/1073741824    28%
Thu Jul 19 16:34:23 [initandlisten]             471859200/1073741824    43%
Thu Jul 19 16:34:26 [initandlisten]             629145600/1073741824    58%
Thu Jul 19 16:34:29 [initandlisten]             796917760/1073741824    74%
Thu Jul 19 16:34:32 [initandlisten]             964689920/1073741824    89%
Thu Jul 19 16:34:37 [initandlisten] waiting for connections on port 27017
Thu Jul 19 16:34:37 [websvr] admin web console waiting for connections on port 28017
Thu Jul 19 16:34:56 [initandlisten] connection accepted from 127.0.0.1:48357 #1 (1 connection now open)
Thu Jul 19 16:35:30 [conn1] end connection 127.0.0.1:48357 (0 connections now open)

Well, there you have it.  It's pretty clear.  It takes just over a minute between mongod starting up and it being ready for connections.

Top tip
Be patient young Jedi.  Mongo is quick, but give it a moment to get out of bed and put on it's dressing gown between ringing the doorbell and banging on the door.

Monday 25 June 2012

Advanced Search on GitHub

Today I was cruising the MongoDB Java driver GitHub repo. I was interested in the implementation of the eval() method, as I wanted to ensure I cater for all returned types within mongometer.

Seemed simple enough, I thought.

I went straight to DB.java and saw that we're calling command() and extracting an object keyed by retval. Interesting, to see retval, a potentially project-wide constant, defined as a String rather than as an Enum. Anyhoo, this isn't a critique of the driver code, so I'll park that for now, I just wanted to find what could possibly be returned by eval().

An easy way to do this is to fetch the branch and search it locally. But I wouldn't really want to do this for every single project that I ever want to cruise? No way, Pedro! So, let's use the online GitHub Search.

    A good place to start: https://github.com/search
    Advanced Search : retval repo:mongodb/mongo-java-driver
    Search for: Code
    Search Language: Java

That all seems sane enough. Right?


Wow! That was unexpected. I haven't been returned the results limited to the filetype of Java, I've been returned a list of files that contain the term java. Let's have a quick look at the querystring.


It seems to be searching for Java, so let's swap out Java for retval, our actual search term.


Now you get the results for retval. We have an unknown number of matches for retval from within the Java driver code base. But is seems we have been returned results for every version of the file that the search term is found in. Let's park that and come back to it later.


You get the same results when you completely remove the language from the querystring. Let's remove it and leave it off as it reverts back to using Java as the search term.


It might not seem like it, but we're getting somewhere. Notice there is a repo parameter on the querystring. Let's pull the repo:mongodb/mongo-java-driver out of the q term and stick it in the repo parameter.


Now on the search form we have a separate input field where you can specify the repo.


So, let's try limiting it to a single version of each file in the repo. Hmmm, not sure how to do this. Anyone got any ideas? I must be missing something as I'd have thought that search is fundamental to any website these days. Anything I try seems to result in with the same error message.

Invalid search query. Try quoting it.

All I want to do is search files for a given string, without having to fetch the entire repo.

I'd look through the github.com repo to investigate further, but I don't seem to be able to find github on github.

To be continued...

Thursday 21 June 2012

Key Stretching; an example

I've had quite a few questions about my previous post (from June 2010) on Passwords since I recently reposted it.

More specifically the questions and comments were around key stretching.

Q.  But doesn't looping that many times slow the password verification step down?
A.  Well yes.  That's kind of the point.  The user may experience negligible latency during the authentication process, this can be tuned to have no or little effect on the user experience.  This same delay is multiplied by the number of brute force attempts made by the attacker.

Q.  The attacker doesn't need the salt or the algorithm if they are going through the front door?
A.  Agreed.  Which is why you'd have some controls and triggers at the front door to alert when abnormal or atypical behaviour is detected.

Q.  If an attack gains access to a system, surely it's game over for user PII?
A.  The thing I like about key stretching is that a hacker needs to have access to the salt, the hashed password and stretching algorithm.  So, if you store the salt in a different table or even DB than the hashed password, the attacker would need to get their mitts on both tables or both DBs. Gaining visibility of the algorithm means that the attacker would also need to have access to, or knowledge about the specific implementation details; ie the source code. Typical environment configurations ensure that there is no way to get to a development environment from a production environment (and vice versa), making it difficult to gain access to the source.

This is a quick and dirty example of what key stretching would look implemented in Java.


This runs in around 0.75 seconds on my local box. Which means every iteration of a dictionary attack or a brute force attack would take the same time.

Caveat: this is purely an example of how you could implement stretching.

Tuesday 19 June 2012

mongometer Unhacked

When I first hacked mongometer together, I didn't think that I'd need to spend more than that one hour on both coding and posting on the hack. However, the more I used it, the more I found it useful a way of comparing the relative performance of my scripts, and the more I found it useful, the more I thought that others may find it useful.

(I also found a few shortcomings/annoyances, which is great, because that gives me some incentive to improve the hack.)

  1. If I needed to change the hosts, the database, the credentials, you needed to rebuild and redeploy the jar.
  2. There was no way to tweak the options [http://api.mongodb.org/java/2.7.2/com/mongodb/MongoOptions.html].
  3. Connections didn't seem to be getting recycled.  You had to shutdown jmeter before the open connections were tried up.
  4. Wanted to ensure that the connection didn't need to be created every time there was an iteration, and that the connection pooling could be utilised

1. Easy enough to the change this, I added the fields that had been frustrating me.

2. Again, easy enough to add these additional properties, though I did come up against a slight frustration

3. This was also slightly frustrating. JMeter didn't seem to be release any of the resources tied up in the Sampler. This was eventually resolved by a bit of experimentation and a bit of 4.

4. This turned out to be a lesson in RTFM. Implementing TestListener allows you to connect to MongoDB at the start of the test run, use the connection pooling during the iterations, and tidy up resources at the end of the run.

Moral
I don't really do 'and the moral of the story is...', but in this case, RTFM is reasonably apt. And, it's quick and easy to hack together something that works, it's not so easy to put together something usable in the longer term; but we all know that.

Request For Comments
If you found this useful, please leave a comment.
If there is a missing feature, please let me know and I'll try and add it.

JMeter Bug Bean

I came across a potential bug in JMeter when adding support for MongoOptions within mongometer. It's not a big deal in itself as I worked around it, but it was slightly frustrating at the time.

Implementing the MongoOptions seemed rather innocuous at the time; after all it's just another bunch of properties the user can alter. I ended up just adding them all at once. Imagine my disappointment when the extension failed to load in Jmeter as intended. To keep a long story short, the offender was wTimeout. Now, wtimeout (is one of a group a rather poorly named variables, others include j and w ), but why was there an issue with wtimeout?

The error of my ways

This is the error that was generated when starting up JMeter:


This is how it was defined, firstly in ScriptSamplerBeanInfo.java


Next, in ScriptSamplerResource.properties


And finally, in ScriptSampler.java


I checked and double checked the spelling. It didn't really make sense, it should've been fine. Out of all the properties that were defined, the wTimeout property was the odd one out, in that it was the only one that had the pattern of lowercase{1}uppercase{N}. All the others were either lowercase{1}, lowercase{N} or lowercase{N}uppercase{N}. So long story, short; switching from wTimeout to doubleuTimeout resolved the issue.


Next, in ScriptSamplerResource.properties


And finally, in ScriptSampler.java


It seems that when performing the creation of the property, if there is only a single lowercase character followed by an uppercase character, we get an error.

The moral of the story

Hmmmm. I don't really do morals, but if this is a bug, then it needs to be fixed. Either way j, w and wtimeout are really rather poor names for variables.

Monday 18 June 2012

Creating your project with IntelliJ

Now we have a development environment configured, lets create the project and start taking it to the next level.

Creating a project in IntelliJ

New Project
New Project from Scratch
Enter the name: mongometer
Select Maven Module
Next
Select Create from archetype (I chose maven j2ee simple)

Arrrrg! Don't do this! Man, IntelliJ sat spinning the tyres for an age.  I ended up killing it and starting again.

To delete a project, close intellij and remove the project folder
projects are in IdeaProjects
$rm -r ~/IdeaProjects/mongometer

Second time around
New Project
New Project from Scratch
Enter the name: mongometer
Select Maven Module
Next
Deselect the create from archetype

Create a package
Create the classes and the properties file

Fix imports
Add dependencies to the pom.xml

This is what I need for mongometer

  • junit4.10
  • mongodb 2.7.2
  • ApacheJMeter_core 2.6
  • jorphan 2.6

Push to GitHub

$cd ~/IdeaProjects/mongometer
$git init
$git add *.java
$git add *.properties
$git add *.xml
$git commit -m 'Initial upload of the project'
$git remote add origin ssh://github.com/yourname/mongometer.git
$git push -u origin +master

Voilà! You can go to your repo, and the project files are there.  Happy days.

Points of interest
  • The + performs a force push to github.  I'm guessing this happened because when I created a new repository on GitHub I opted to create the README file.  I won't do this again.
  • IntelliJ complained about setting up the repo outside of IntelliJ.  No problem, you just add the repo inside IntelliJ.  I've been an Eclipse person for years (though we've decided that we'd like spend some time apart) so I'm not 100% sure of how to do this inside IntelliJ just yet.
  • This is a great site for listing dependencies http://mvnrepository.com/ for setting up your pom.xml

Configuring the mongometer Development Environment

As I've already set up a git repository on Ubuntu and published the step-by-step, command-by-command instructions for doing this, I thought it would be worth publishing the same guides for setting up the entire development environment on Ubuntu.

Set up your JDK

Download
http://www.oracle.com/technetwork/java/javase/downloads/jdk-7u4-downloads-1591156.html

Configure
$tar -xvf ~/Downloads/jdk-7u4-linux-x64.tar.gz
$sudo mkdir -p /usr/lib/jvm/jdk1.7.0
$sudo mv jdk1.7.0_04/* /usr/lib/jvm/jdk1.7.0/
$rm -r jdk1.7.0_04
$sudo update-alternatives --install "/usr/bin/java" "java" "/usr/lib/jvm/jdk1.7.0/bin/java" 1
$sudo update-alternatives --install "/usr/bin/javac" "javac" "/usr/lib/jvm/jdk1.7.0/bin/javac" 1
$sudo update-alternatives --install "/usr/bin/javaws" "javaws" "/usr/lib/jvm/jdk1.7.0/bin/javaws" 1
$mkdir ~/.mozilla/plugins/
$ln -s /usr/lib/jvm/jdk1.7.0/jre/lib/amd64/libnpjp2.so ~/.mozilla/plugins/

Set up MongoDB

Download
http://www.mongodb.org/dr/fastdl.mongodb.org/linux/mongodb-linux-x86_64-2.0.6.tgz/download
$md5sum ~/Downloads/mongodb-linux-x86_64-2.0.6.tgz
69eece640fcb1684190a4585f31df954

Configure
$tar -zxvf ~/Downloads/mongodb-linux-x86_64-2.0.6.tgz
$sudo mkdir -p /usr/lib/mongodb/2.0.6
$sudo mv mongodb-linux-x86_64-2.0.6/* /usr/lib/mongodb/2.0.6/
$rm -r mongodb-linux-x86_64-2.0.6
$sudo mkdir -p /data/db
$sudo chown `id -un` /data/db
$/usr/lib/mongodb/2.0.6/bin/mongod --dbpath /data/db --logpath /data/db/mongod.log
$mongod --config /etc/mongod.conf

(from a new terminal start the shell)
$cd /usr/lib/mongodb/2.0.6/bin/
$./mongo
> db.test.save( { a: 1 } )
> db.test.find()

Set up Maven

Download
http://www.apache.org/dyn/closer.cgi/maven/binaries/apache-maven-3.0.4-bin.tar.gz
$md5sum ~/Downloads/apache-maven-3.0.4-bin.tar.gz
e513740978238cb9e4d482103751f6b7

Configure
$tar -xzvf ~/Downloads/apache-maven-3.0.4-bin.tar.gz
$sudo mkdir -p /usr/local/maven/3.0.4
$sudo mv apache-maven-3.0.4/* /usr/local/maven/3.0.4
$rm -r apache-maven-3.0.4

$sudo gedit /etc/environment

JAVA_HOME="/usr/lib/jvm/jdk1.7.0"
M2_HOME="/usr/local/maven/3.0.4"
MAVEN_HOME="/usr/local/maven/3.0.4"
M2="/usr/local/maven/3.0.4/bin"
PATH="/usr/local/sbin:/usr/local/bin:/usr/sbin:/usr/bin:/sbin:/bin:/usr/games:/usr/local/maven/3.0.4/bin"

Verifiy the configuration
Logout and login

$mvn -version
$mkdir ~/.m2
$sudo chown `id -un` -R ~/.m2

Set up IntelliJ

Download
http://www.jetbrains.com/idea/download/

$tar -xvf ~/Downloads/ideaIC-11.1.2.tar.gz
$cd ~/idea-IC-117.418/bin
$chmod +x idea.sh
$./idea.sh

(this is the initial install of intellij, so take the second option)
File -> Project Structure
Platform Settings -> SDKs
Add -> JSDK
 /usr/lib/jvm/jdk1.7.0/
 Select -> OK

Set up JMeter

Download
http://mirror.lividpenguin.com/pub/apache//jmeter/binaries/apache-jmeter-2.7.tgz
$md5sum ~/Downloads/apache-jmeter-2.7.tgz
73435baa6ed99c528dacfa36c7e1f119

Configure
$tar -zxvf ~/Downloads/apache-jmeter-2.7.tgz
$sudo mkdir -p /usr/lib/jmeter/2.7
$sudo mv apache-jmeter-2.7/* /usr/lib/jmeter/2.7/
$rm -r apache-jmeter-2.7
$/usr/lib/jmeter/2.7/bin/jmeter.sh

Saturday 16 June 2012

Install git on ubuntu

This is a brief step by step guide to install git and hook up to github using ssh.

Get git
$sudo apt-get install git-core

Check the install
$which git
$git --version

Configure git
$git config --global user.name "Firstname Lastname"
$git config --global user.email you@domain.com

Set up your ssh key
$ssh-keygen -t rsa -C "you@domain.com"
[hit enter]
set your key password
Your identification has been saved in /home/username/.ssh/id_rsa.
Your public key has been saved in /home/username/.ssh/id_rsa.pub.
The key fingerprint is:
fingerprint you@domain.com

Add the key to github
$less ~/.ssh/id_rsa.pub
Copy the key to your clipboard

Go to your github Account Settings

Click "SSH Keys" in the left sidebar
Click "Add SSH key"
Paste your key into the "Key" field
Click "Add key"
Confirm the action by entering your GitHub password

Verify the key
$ssh -T git@github.com
Y
enter the key password

You should get a success, "but GitHub does not provide shell access".

Set up a test repo
$mkdir repo-name
$cd repo-name
$git init
$touch README
$git add README
$git commit -m 'first commit'
$git remote add origin https://github.com/gitusername/repo-name.git
$git push -u origin master

you'll get a 403 error

Getting past the 403 error
$vi .git/config
change https for ssh
$git push -u origin master

you'll get a Permission denied (publickey) error

hmmm

$ssh-add -l shows the same fingerprint as the account settings on github
$ssh -vT git@github.com comes back saying I have successfully authenticated...

Getting past the Permission denied error
$cd ~/.ssh
$vi config

Host github.com
User git
Port 22
Hostname github.com
IdentityFile ~/.ssh/id_rsa
TCPKeepAlive yes
IdentitiesOnly yes

$git push -u origin master

Happy days! You should now see the README file on github

Tuesday 1 May 2012

A life ban from Stackoverflow


So, today I decided I'll spend an hour looking at StackOverflow and helping out where I could. It has come to the rescue on a few occasions in the past so I thought I'd return the favour.

I signed up and started looking at the > 3 million questions. Bound to be something in there I can help with. I looked at the newest questions and clicked through. Many of the questions are poorly phrased, some aren't even asking a question and others just want the code; they don't want to do any thinking, they don't want to write the code, they just want the code sent to them.

So I tackled a few questions, some on mongodb, some on jquery, some of java and some javascript.

Some question gets answered so quickly, so you have to be quick. The reason is your post can be deleted if it is deemed a duplicate answer and deletion count against you. There were a couple of occasions where there was less than a minute between my answer and a similar answer were posted and one of them being deleted as a duplicate. 

As a new user I cannot post comments. I didn't think anything of it at the time, so I put my requests for further information in the answer boxes. I had a few responses and started to earn a few points. Then I started to get lambasted for not answering the question and just asking more questions. I've always thought it is difficult to answer a question if it is unclear what is being asked. Eventually, whilst posting an answer to a mongodb question and the 16M BSON limit I received the message stating my account was now banned from posting and would never be reinstated; a life ban.

So basically, I had to earn 50 points before I can comment. But I can't earn any points until I understand the question or there is at least enough information in the question for it to be answerable, or at least until it is actually a question.

Apparently this has already been discussed here

I guess that is the good deed of the day shot down in flames. I'll think twice before I attempt to help again.

So, should we boycott Stack Overflow?

Hell no! It has saved my life on a couple of occasions. They could/should however make easier for people (esp. those new and/or under 50 points) to ask for clarity in poorly phrased questions, or in some instances ask the asker what it is they are actually asking.

Thursday 26 April 2012

Performance testing MongoDB

So, this morning I was hacking around in the mongo shell. I had come up with three different ways to aggregate the data I wanted, but wasn't sure about which one I should subsequently port to code to use within my application.

So how would I decide on which method to implement? Well, lets just choose the one that performs the best. Ok, how do I do that? Hmmm. I could download and install some of the tools out there, or I could just wrap the shell code in a function and add some timings. OR, I could use the same tool that I use to performance test everything else; JMeter. To me it was a no brainer.

So how do we do it?

There is a full tutorial here.

Simply put, you need to do the following:
  1. Create a Sampler class. 
  2. Create a BeanInfo class. 
  3. Create a properties file. 
  4. Bundle up into a jar and drop into the apache-jmeter-X.X\lib\ext folder 
  5. Update search_paths=../lib/ext/mongodb.jar in jmeter.properties if you place the jar anywhere else. 

How I did it

I tend to have a scratch pad project set up in my IDE, so I decided just to go with that. Just to be on the safe side, I imported all the dependencies from:
  • apache-jmeter-X.X\lib 
  • apache-jmeter-X.X\lib\ext 
  • apache-jmeter-X.X\lib\junit
I then created the two classes and the properties file.


I then exported the jar to apache-jmeter-X.X\lib\ext, and fired up jmeter.

Go through the normal steps to set the test plan up:
  1. Right click Test Plan and add a Thread Group. 
  2. Right click the Thread Group and add a Sampler, in this case a MongoDB Script Sampler. 
  3. Add your script to the textarea; db.YOUR_COLLECTION_NAME.insert({"jan" : "thinks he is great"}) 
  4. Run the test

Happy days.  You can then use JMeter as you would for any other sampler.


Future enhancements

This is just a hack that took me 37 minutes to get running, plus 24 minutes if you include this post. This can certainly be extended to allow you to enter the replicaset config details for instance and to pull the creation of the connection out so we're not initiating this each time run a test.

Wednesday 28 March 2012

Store numbers as numbers

Have you ever had your inner voice say to you 'you idiot' or 'you tool' or just 'Bravo' whilst clapping sarcastically (Homer: The Last Temptation of Homer)? Yeah, me too, twice this week in fact. The second instance was particularly embarrassing, so I think I should share it. It was more embarrassing as I was just complaining that morning about how the MongoDB drivers should probably implement basic functions such as this.

Now the eagle-eyed among you will spot this straight away, so please don't shout out the answer and spoil it for everyone else.

Imagine you have a collection - I'll keep it as small as possible so that the error stands out more - and you want to find the maximum value of "someNumber". Simples; I've done this a thousand times, well hundreds of times. I think for the first five times I had to find the max I implemented a different solution each time; back when I first started with Mongo.

I'm going to show only one way of finding the maximum value, I'm choosing this particular method for no other reason than it's probably the simplest and easiest to understand.

In this slightly contrived example I only have 10 documents in the collection and in my defence the collection I was working on had a few hundred thousand - not much of a defence granted, but henceforth I'll refer to it as the Jan Defence. So, initially I ran this query:

Worked first time I thought. Rock on. Hang on... that number seems a bit low. Let's put in some logging:

Instead of the 10 represented here, replace that with a number as per the Jan Defence. Lets put in some more logging.

Again, remember the Jan Defence. Surely 50 isn't bigger than 200.

<penny drops/>

It is, if it is a String. 'You tool'.

Et voilà!

Fortunately I didn't burn too much time with this.

The moral of the story? You should store your numbers as numbers.

If anyone would like to see more implementations of finding the max and min values, I'm happy to share.

Monday 12 March 2012

Mongodb MapReduce scope variables

I recently had a requirement for conditional emission from a map function. Essentially I only wanted to emit where the date was within a given range.

In SQL, grouping a count for a given time granularity within a date range would look something like this:

I wasn't 100% sure about the 'right way' to achieve this in NOSql/MongoDB. So this is a solution.
It requires you to know about scope variables. Problem is, I found that scope variables are not very well documented. You can find more about scope variables in the MongoDB documentation MapReduce-Overview. The relevant parts are:

      [, scope : <object where fields go into javascript global scope >]
and
      scope - can pass in variables that can be access from map/reduce/finalize.

Back to this example. First, let's define some data:

Before we implement this, lets get it working at the command-line, in our mongo shell:

What is happening here?

Well, we're selecting the sub-document of this collection where the value of "meh" is "meh". Then we've defined two dates; from and to to represent the boundaries of the date range, we're including these within the MapReduce function call. Basically what this means is that we can use what ever is defined here in the Map function (btw, we can also use them in the Reduce and Finalize functions).

Once we have this working from the shell, it is straight forward to implement it. This is the very same implemented in Java.

Caveat: This is an example of how to use scope variables, I'm sure if you go to any of the Events or gmane.comp.db.mongodb.user group you'll get some advice straight from the 10Gen guys.

Friday 9 March 2012

Changing date types; from JavaScript UTC to Mongo ISODate

The scenario is this.

You have an HTML form that allows your customer to add an arbitrary amount of stuff to something. stuff is a partial JSON document which is a list of String/String and String/Date NVPs contained within something. Mongo will by default store the date as an ISODate. With that said, the something collection looks something like this:


The simple solution to the format issue is to display the Date as an ISODate on the form, thus when the form is submitted, the date can be treated just like any other string (though you still need to tell mongo to treat it as a Date and not a String, so you need to 'find' it and change the type; more on that later).

Would display: 2011-11-01T11:51:46.000Z

But that would be way too easy; in the real world, easy is considered as rare as unicorn herders. The Use Case/User Story/Whatever acceptance criteria is that we display the Date in the full UTC form. OK then.

Which would display: Tue Nov 01 2011 11:51:46 GMT+0000 (GMT Standard Time)

This is easily done, in fact, it is easier than displaying it as an ISODate, but now we have to parse it and convert to an ISODate, which involves finding it in the JSON document first.

Parsing a UTC date into an ISO is trivial but should have been easier than this - I needed to faff around with the DateFormat string before I got rid of the ParseExceptions.

This is roughly how I did it. Doesn't look too pretty tbh.


It's amazing how simple this should be. You set it up as a date, you pass in a date, yet you still need to explicitly convert it from initially from a String to Date, and then from UTC to ISO.

Tuesday 6 March 2012

Neo4j: Mechanically Sympathetic

About a month ago I was 5 minutes late for a #skillsmatter event, a talk on #neo4j and mechanical sympathy. The talk was given by a #neo4j employee, thus given by someone in-the-know.

Because of my tardiness I missed why neo4j is mechanically sympathetic; the whole point of the talk. I should have had a chat with the presenter after the talk to clear up my lack of understanding, however the Slaughtered Lamb is not as conducive to conversation as it once was...

Are we saying that neo4j is mechanically sympathetic in terms of the records being powers of 2, or that the talk allows us to understand how neo4j works in the same way that Jackie Stewart knew how his cars worked because he had previously worked as a mechanic? I'm guessing the later as the neo4j cheat sheet shows records as 5, 9, 25 and 33 bytes, not exactly powers of 2.

A question came up during the session about the how many nodes you could have; the maximum NodeRecordIdSize. The response was that it wasn't 4 bytes as shown on the cheat sheet, but 4 bytes, plus 7 bits. The suggestion was that you could use the 7 'spare' bits of the 'in use' byte as only 1 bit of this byte is actually used.

With that said, my questions is, how would that affect the 4 byte reference allocation in, for instance, the RelationshipRecord, which is only allocated 4 bytes? Where are the 7 'spare bits' stored?

From form to collection

I know I haven't posted anything for a while. The reason for that has been a mixture of being quite busy at work and home, sheer laziness and being on leave.

I've been hacking around for the last hour trying to find the easiest/quickest way to update an array of name/date pairs within a collection from a form, and its slowing dawning on my there is no elegant or even cheeky shortcut. It would be trivial if we were representing the date as a plain string, however, I want to use the mongo ISODate; besides, there is no point in making it easy for myself.

(Before I go any further I should point out I should be doing this in the DAO not on the client. This involves pulling out the array from the JSON object and iterating over each name/date pair and using the java.util.Date to create the dates)

So, lets say I have this form with stuff on it, plus a bunch of name/date pairs that we create dynamically and populate with their current values, like this...


Now lets say I want to be able to edit the dates, and PUT the form. Rock on, we can use the code from a previous post. Convert HTML form to JSON and POST using jQuery But hold on a second, Mongo is going to expect the date as a date type. This means we need to convert it from a Date to an ISODate. Fortunately this is trivial enough.


So we need to update formToJSON to look for specific fields. Rather than fall into some Turing tarpit, I'm going to hack it so I'm solving this problem only - and then go for a swim in the tarpit later.


Now we need to make sure that mongo know is is a date type and not just a string, so we need to use $date. OK.


Well, after hacking that in, we should be about there. Well, not quite. The next hurdle is the stringify method. It will escape the double quotes and PUT the string with \" instead of ". What a pain. So after we create our JSON string we need to do a bit more "tidying up". We need to replace \" with ". We can simply use replace() right? Now of course javascript replace only replaces the first instance, so we need to be a bit cheeky and pass in the find string along with the /g modifier.


Great, we're there. Almost. Finally we need to strip the extraneous " around the date value.


Well, that was easy (-;

I'm off to factor all this into what was a relatively elegant form to json conversion.
There is an easier way to do this. However, easy is no fun.

Tuesday 17 January 2012

Refamiliarising oneself with Selenium

My main focus over the last few years has been Information Security and more specifically Application Security.  As such I've not cut much production code of late and have probably let much of my development practices atrophy.  However, recently I've had the opportunity to get back on the development bike and ride around a little.

I'm used to, as of course we all are, writing unit tests at the service layer, the persistence layer and of course the presentation layer, so nothing new there.

As an aside, I remember many years ago having a conversation with a front-end 'Architect' that stated you cannot unit test a front-end; cue HTMLUnit/HTTPUnit/JWebUnit and some red faces.  (I wonder how those frameworks have progressed in the last few years - perhaps the topic for a future post).

Anyway, I've been kicking around some front end code whilst picking up jQuery and what not, so I thought I'd wheel out some of the old favourite *Unit frameworks and I thought I'd also reacquaint myself with Fitnesse and Selenium skills.  But one step at a time.  I thought I'd get back into Selenium slowly and rather than jumping straight into the client/server setup, I went with the Selenium IDE - the Firefox plugin.  This is a post recording said reacquaintance process over the last day or so.

Getting Started
Download http://seleniumhq.org/download/
  Selenium IDE 1.5.0
  I'm running Firefox 9.0.1

Once you restart Firefox you'll want to bring up the Selenium UI.
  1. Firefox -> Web Developer -> Selenium IDE.
I have created a small 'admin app' for the purposes of this post - slightly contrived - that allows me to CRUD an entity.  Its mainly basic HTML with some jQuery, and so that I can include more of the Selenium commands I've included other elements such as some frames; I have a navigation frame at the top of the page and a main frame below that which essentially acts as a content container.

So to the first test suite
The navigation frame is a good place to start.  To keep this as simple as possible I'm going to create a test case for each of the items in the navigation frame and verify the result by testing for the existence of some text in the content frame.


                                               "Home", "Search", "Create", "List", "Report"

Let the testing commence
  1. Bring up the context in the left panel and select New Test Case.  
  2. Rename the test by selecting properties. 
  3. Hit record - the red circle up on the right hand side Selenium. 
  4. On the browser, select Home. 
  5. Wait for the frame to display, select some unique text to that page. 
  6. Bring up the context menu and select 'verifyTextPresent your_unique_text' 
  7. Run the test case.  The bar is red...

Oh dear.  What happened there?   The error is:
[error] There was an unexpected Alert! [Error! Status = 0 Message = error Message = ]

So from that, you can deduce the cause; its simple.  Well, it is and its not depending on your Selenium experience.   You'll have to change the logging level to figure out more information on the problem.  I set this at 'Debug', it's a fair bit more verbose, but its worth doing it to begin with.  When you select this level it becomes much clearer.  Selenium is failing when its trying to select the content frame.  Okay, so lets clickAndWait; tell Selenium to wait for the page that we just requested to finish loading.  Let try running that test again.  The bar is red....


Grrrr.  What happened there?  The error is:
[error] There was an unexpected Alert! [Error! Status = 0 Message = error Message = ]

Same error as before.  I (thought I'd) found two distinct solutions for this.  The first is just to slow the speed at which the testsuite executes down.  You can do this by going to the slider and moving it slightly to the right.  This however does not address the root cause.


The second is, and I should have used this before trying clickAndWait tbh, to waitForFrameToLoad, or so I thought.  I added this after the clickAndWait (I could just revert this clickAndWait to just click), adding the name of the frame and a timeout, but I started to get the same error as above when I ran the tests at full pelt.  In the end I lost my patience, and as a rule of thumb I run the test at ~20% slower than full speed.  ISSUE_1 If someone know the solution to the root cause, please ping me; I'd rather not waste any more time on that particular issue.

So back to the tests
  1. Repeat the creation of test cases for each of the navigation elements.  Now you have five simple tests to run.  If the bar is green... and it is.  Sweet.
Now to save your work so far
  1. File -> Save Test Suite As... 
  2. Select a name and save. 
Now, let's simulate a cold start
  1. Firefox -> Web Developer -> Selenium IDE 
  2. File -> Open Test Suite...
Oh oh!


Ouch!  So what is going wrong here?  A quick look at the file that was written to disk only raises further questions. The file size for a start is only 1k.   On opening the file I'm presented with some html with only the test case names defined, no content.  Pants.  But, I was saving the testsuite after every change.  It turns out I wasn't saving the individual testcases.  I'll get my coat...  (This is so embarrassing I almost omitted it for this post)  Ah well, lesson learned, lets start again.  It is a bit annoying that you have to save each case individually, surely by saving the testsuite you're implicitly saying '...and save the testcases'.

I'm going to repeat the above, but this time save each individual testcase as I create it.  I've ended up with the following files:

Running the testsuite produces the following results; Runs: 5, Failures 0.  The bar is green...  Happy days.

Knock it up a notch

So these tests were really rather trivial, (barring the issue with waiting for a page to load...) so next we should tackle a form.
  1. Bring up the context menu and create a New Test Case.  
  2. Rename the test by selecting properties. 
  3. Hit record. 
  4. Hit Create on the navigation frame. 
  5. Fill in the form fields one by one.
  6. And stop recording.. 
Hey wait a minute.  Some of the form-filling didn't get recorded.  FFS!  ISSUE_2  After spending a bit of time searching the interweb, I found nothing to help me.  Grrr!  This didn't seem to make any sense, the form  tag was pretty standard, as were the input tags.

Well, it seems I was the architect of my own downfall; whilst trying to be a bit clever and have the input field label in the form field itself I'd inadvertently hit a Selenium edge case.  The issue was with the "placeholder" attribute of the input tag, after removing it from the input tag the actions were recorded as expected.  That was annoying.

    <input id="description" type="text" name="description" placeholder="some description" />

I could be lazy and remove all the placeholder attributes and record myself entering values into the form, but I'm going to use this as an opportunity to exercise my xpath skills.

Manual form filling

Doing this manually isn't that bad, plus I get some practice with xpath and with the Selenium IDE.  So for the first field of the form I want to emulate the user typing a unique identifier.

                   Basically this is saying, for the input field with the id attribute value of id, type in 667.

All of the fields follow the same pattern now all that needs to be done is to click the form submit button and verify that certain text is present.  Continuing in that vein I built up a sizeable set of tests always running the suite after each additional testcase.

After a while, working out the xpaths for elements became tedious, even for the more complex paths, so I ended up using FireBug (https://addons.mozilla.org/en-US/firefox/addon/firebug/)

Some tips
  1. Remember to select the correct frame
  2. Don't be clever and use the placeholder attribute
  3. Use a plugin that will help you with the xpaths
  4. Don't run the testsuite at maximum speed

Tuesday 3 January 2012

MongoDB and CRUD, or should that be ISUD

I started this blog to remind myself of the solutions to development issues I have along the way and as a general hinting mechanism to remind myself what is going on when I have been away from it for a while. If any of this means that someone else reading this saves themself a world of hurt or going down the rabbit-hole of death, then I'm glad that recording it publically rather than privately was helpful (though conversely, it is always important to learn from one's owner experiences).

In my first posting Simple mongodb equivalents, I wanted to remind myself of some of the basic differences around selection between SQL and NoSQL, and to give concrete examples of what this would look like in Java. In this posting I'll go through the next stage, the hinting mechanism for CRUD.

For those that associate crud with filth, flattery, disgust or disappointment, then you may be on the wrong blog. CRUD stands for CREATE, RETRIEVE, UPDATE, DELETE - though the RETRIEVE is usually replaced by get or SELECT at implemention and CREATE is replaced with INSERT. So, perhaps I'll call it ISUD instead.

First, set up the database, a user and set up an index.

The CREATE (or INSERT) of CRUD (or ISUD)
Here we a setting up some basic data in a collection named 'stuff' that lives in the 'isud' database.

...this is how you would do it from the mongo shell...
...and the Java implementation...

The RETRIEVE (or SELECT) of CRUD (or ISUD)
The selection or retrieval of a document from the collection 'stuff' can be rather powerful, as per Simple mongodb equivalents.

...this is how you would do it from the mongo shell...
...and the Java implementation...
Now let's do a similar thing but this time specify the fields we want returned.

...this is how you would do it from the mongo shell...
...and the Java implementation...

The UPDATE of CRUD
Everyone knows his name was Eric, not Derek, so let's fix that with an update.

...this is how you would do it from the mongo shell...
...and the Java implementation...
Please refer to Updating a document using the default ObjectId for the reasoning behind DBObjectFactory


The DELETE of CRUD
Finally, we can delete a document.

...this is how you would do it from the mongo shell...
...and the Java implementation...
It's all relatively straight forward really. Though none of this is rocket science, I for one find this a useful and succinct reminder or as previously stated; a hinting mechanism.