Sunday, 20 January 2013

SpiderMonkey to V8 and mongometer

With 10gen switching the default JavaScript engine for MongoDB 2.3/2.4 from SpiderMonkey to V8 I thought I'd take the opportunity to compare the relative performances of the releases using mongometer. Being a Security bod, I really should have looked at the Additional Authentication Features first... Hey ho.

I'll document the steps taken during the comparison, including the set up, so this can be repeated and validated - just in case anyone is interested - but mainly so I can remind myself of what I did; memory, sieve.

The set up
I'm going to install 2.2.2 and 2.3.2 side-by-side on a dedicated machine. I'll then use the latest version of the Java driver with mongometer.

$ wget http://fastdl.mongodb.org/linux/mongodb-linux-x86_64-2.3.2.tgz
$ wget http://fastdl.mongodb.org/linux/mongodb-linux-x86_64-2.3.2.tgz.md5

I got a 403 response for this request...

$ wget http://fastdl.mongodb.org/linux/mongodb-linux-x86_64-2.2.2.tgz
$ wget http://fastdl.mongodb.org/linux/mongodb-linux-x86_64-2.2.2.tgz.md5

$ md5sum -c mongodb-linux-x86_64-2.2.2.tgz.md5
md5sum: mongodb-linux-x86_64-2.2.2.tgz.md5: no properly formatted MD5 checksum lines found


Grrr. An md5 file is supposed to be the checksum (then x2 spaces) and then the filename of the file being checksummed. I'll have to eyeball them instead, well, eyeball the one that I could actually download...

$ md5sum mongodb-linux-x86_64-2.2.2.tgz
be0f5969b0ca23a0a383e4ca2ce50a39 mongodb-linux-x86_64-2.2.2.tgz

$ cat mongodb-linux-x86_64-2.2.2.tgz.md5
be0f5969b0ca23a0a383e4ca2ce50a39


Configure
$ tar -zxvf ~/mongodb-linux-x86_64-2.2.2.tgz
$ sudo mkdir -p /usr/lib/mongodb/2.2.2
$ sudo mv mongodb-linux-x86_64-2.2.2/* /usr/lib/mongodb/2.2.2/
$ rm -r mongodb-linux-x86_64-2.2.2
$ sudo mkdir -p /data/db/2.2.2
$ sudo chown `id -un` /data/db/2.2.2
$ /usr/lib/mongodb/2.2.2/bin/mongod --port 27000 --dbpath /data/db/2.2.2 --logpath /data/db/2.2.2/mongod.log

$ tar -zxvf ~/mongodb-linux-x86_64-2.3.2.tgz
$ sudo mkdir -p /usr/lib/mongodb/2.3.2
$ sudo mv mongodb-linux-x86_64-2.3.2/* /usr/lib/mongodb/2.3.2/
$ rm -r mongodb-linux-x86_64-2.3.2
$ sudo mkdir -p /data/db/2.3.2
$ sudo chown `id -un` /data/db/2.3.2
$ /usr/lib/mongodb/2.3.2/bin/mongod --port 27001 --dbpath /data/db/2.3.2 --logpath /data/db/2.3.2/mongod.log

Let's check they are running.

$ ps -ef | grep mongod
1795 /usr/lib/mongodb/2.2.2/bin/mongod --port 27000 --dbpath /data/db/2.2.2 --logpath /data/db/2.2.2/mongod.log
2059 /usr/lib/mongodb/2.3.2/bin/mongod --port 27001 --dbpath /data/db/2.3.2 --logpath /data/db/2.3.2/mongod.log


Now, let's kill one (gracefully) and move on to the interesting stuff.

$ sudo kill -15 2059
$ ps -ef | grep mongod
1795 /usr/lib/mongodb/2.2.2/bin/mongod --port 27000 --dbpath /data/db/2.2.2 --logpath /data/db/2.2.2/mongod.log


Now I'm jumping on to another box.

$ wget https://github.com/downloads/mongodb/mongo-java-driver/mongo-2.10.1.jar
$ cp mongo-2.10.1.jar /usr/lib/jmeter/2.8/lib/ext
$ cp ~/IdeaProjects/mongometer/out/artifacts/mongometer_jar/mongometer.jar /usr/lib/jmeter/2.8/lib/ext
$ /usr/lib/jmeter/2.8/bin/jmeter.sh


The tests
The tests are really rather basic; I'll perform an insert into two different databases, and perform finds against those databases.

Version 2.2.2

> show dbs
local 0.078125GB


> show dbs
jmeter 0.203125GB
jmeter2 0.203125GB
local 0.078125GB

> use jmeter
> db.jmeter.find().count()
1000
> db.dropDatabase()

> use jmeter2
> db.jmeter.find().count()
1000
> db.dropDatabase()

$ ps -ef | grep mongo
2690 /usr/lib/mongodb/2.2.2/bin/mongod --port 27000 --dbpath /data/db/2.2.2 --logpath /data/db/2.2.2/mongod.log

$ sudo kill -15 2690
$ ps -ef | grep mongo

Nothing. Let's get the 2.3.2 instance up and running.

$ /usr/lib/mongodb/2.3.2/bin/mongod --port 27001 --dbpath /data/db/2.3.2 --logpath /data/db/2.3.2/mongod.log

$ ps -ef | grep mongo 2947 /usr/lib/mongodb/2.3.2/bin/mongod --port 27001 --dbpath /data/db/2.3.2 --logpath /data/db/2.3.2/mongod.log


Version 2.3.2

> show dbs
local 0.078125GB


> show dbs
jmeter 0.203125GB
jmeter2 0.203125GB
local 0.078125GB

> use jmeter
> db.jmeter.find().count()
1000
> db.dropDatabase()

> use jmeter2
> db.jmeter.find().count()
1000
> db.dropDatabase()


Conclusions
I guess you should draw your own. I ran this a couple of times and am considering scripting it so the environments are cleaned down prior to each run, I could probably add more complex queries too. Perhaps if I find some time next weekend then I will.

If you have any suggestions, please leave a comment.

Saturday, 19 January 2013

mongometer v2.0

A while back I knocked up mongometer to compare the relative performance of MongoDB scripts. I then made some minor changes, and since then - and only recently - made additional changes based on feedback.

I've now made slightly more significant changes. I'll now cover them briefly.

The minimum JMeter version is now 2.8, this is because it is dependent on a change introduce in JMeter 2.8.

I've created a MongoSourceElement which is accessible from the context menu; Add -> Config Element -> MongoDB Source Config

This pulls all the MongoDB connection details up a level and allows you to share it between multiple MongoScriptSamplers. This means you only need to define the connection once and associate a source name with the instance. When you create a MongoScriptSampler you can then reference the source name as defined in MongoSourceElement.

MongoScriptSampler now only includes the fields that you need. It allows you to specify the mongo source, the database, the database credentials and of course the script to run.

The way I'm currently using it is to create a MongoSourceElement.
Under that I create a ThreadGroup.
And under that I add the MongoDB Script v2.0, View Results Tree, and Graph Results.

If I have multiple script to run, I use the same grouping of, MongoDB Script v2.0, View Results Tree, and Graph Results. See the image below for an example.


There is the added MongoUtils class which has a static method which allows you to specify multiple hosts (if you want) and breaks it out into each host and port, returning an ServerAddress, which to be honest, I'm surprised isn't available under the Java MongoDB driver.

The other semi-useful addition is the QuickEnvironment. It basically allows you to start up mongod, mongo, jmeter and a tail of the jmeter log. You could do this in a script, but hey ho, I did it in a helper class.

The latest version is available on github.

Please have a play, try and break it, make suggestions, give me feedback.

Sunday, 23 December 2012

S3 MOD

The first thing I ask myself is why? Why flash a new phone, running the latest OS, voiding the warranty and risk bricking it... Two, well, three reasons really.

The first reason; I don't like the feel of the Samsung gumpf on top of JellyBean; I'd had the phone for a month, but I still wasn't getting on with the Samsung layer. I guess I was so used to the LAF of my Nexus 7, which after 6 months, I'm still loving btw.

The second reason is, the battery life on the S3 is far worse than I expected. I'd go a day, without doing much on the phone, and I'd burn through the entire battery - the top two offenders being the screen and the OS. I'd had my HTC Desire for ages, as soon as it first came out in fact. I was getting used to having it on charge pretty much any time I sat down at my desk and was thinking, hoping that a new device wouldn't require charging all the time. The Nexus 7 battery life is awesome; I'd have to be playing a graphic intensive game for an entire day to get through a full battery charge.

The third reason; just because, I'm a geek, that's what geeks do.

So after flashing my S3 from stock to CM10, I had a couple of minor issues.

First of all, the Ubuntu walkthrough didn't work for me, so I had to go down the Windows root, sorry route. (Good, concise, clear tutorial; thanks @galaxys3root)

Secondly of all, the flashing of clockworkmod didn't seem to stick, though this seemed to remedy itself on the 3rd flash. I'm not sure why it stuck on the 3rd attempt tbh. I used Odin to root the phone, which worked first time. I also used Odin to replace Android System Recovery with CWM, the settings were the same each time flashed CWM, and it was only the 3rd time that it stuck. The settings I used were pretty much default but I deselected auto-reboot; so ensure all of the Options are deselected - this is so the phone doesn't reboot straight away and you can pull the battery.

Third of all, there was an issue was with the external SD card. CWM couldn't see it. The card would not format in the phone. None of my Ubuntu machines recognised the card, and Windows wanted to reformat it. "You need to format the disk in drive E: before you can use it."

I got a bit #LazyWeb about this and asked about it on the cyanogenmod forum and on android.stackexchange but didn't get too much back tbh.

Here's a tip for you if you still have data on there that you want to retrieve. On a Windows box you can run:

Start -> cmd -> chkdsk e: /f

Windows will then recognised it, and pop up the AutoPlay applet. You can then back up any data that you may have missed prior to flashing the phone.

I formatted the card as ExtFat. It reports 59.4GB even though it's a 64GB card. That didn't work at and my progress bar was still at 0%

Let's try formatting on Ubuntu... Dang! Ubuntu doesn't have support for ExFat; you'll need to

sudo add-apt-repository ppa:relan/exfat
sudo apt-get update && sudo apt-get install exfat-utils fuse-exfat


Let's have a look at the partitioning. You'll need gparted for this:

sudo apt-get update
sudo apt-get install gparted


Pop the card into the adapter.
Start up gparted.
unmount the card.
Format as ext4
Pop it back into the phone.

I didn't get an error this time and the phone shows the message that it is preparing the card, but it doesn't mount.
You still get the same error through CWM too.

Pop the card into the adapter.
Start up gparted.
unmount the card.
Format as ntfs
Pop it back into the phone.

I didn't get an error but the phone still shows the message that it is preparing the card, but doesn't mount

Ah, well. Looks like I'm going to have to settle for 32GB.

Pop the card back into the adapter.
Start up gparted.
unmount the card.
Format as fat32; gparted show the partition as 29.23GB.
Pop it back into the phone.
I didn't get an error. Wait... Wait... Wait... It's mounted!
Go to ICS SD Binder set the mapping to the desired path, and hit save and reboot.
When the phone restarts, you'll see this:
Total space 59.43GB
Available space 59.43GB

I didn't really expect that tbh. It looks like it has taken the 29.23GB partition and automagically repartitioned it as 59.43GB. Awesome!

It's still very early days, but CM10 is looking good so far.

The biggest two battery offenders are still the screen and the OS. I have some spare batteries on order, and with the Samsung gumpf now off my phone, the battery is my only gripe with the S3.

I'm going to end with a question. What does the Samsung layer give that I can't get from CM10 and the app store?

For example: AllShare... I've replaced with BubbleUPnP

Useful Links:

Google Apps

CM10 Updater App

Friday, 9 November 2012

Integrating with Quality Centre

I've recently had to go elbow deep to resolve an issue where a product developed by a company does not play well with a second product developed by the same company via a plugin, also developed by the same company.

As is my way, I'm posting the issue and the solution in a bid to reduce the average amount of pain felt.

WARNING: HP Quality Center Plugin exception
com4j.ComException: 800413ed (Unknown error) : Parameter Type is Invalid : .\invoke.cpp:517

The fix for this turned out to be replacing the empty String with a com4j.Variant.Type.VT_NULL
import com4j.Variant;

Then replace
Com4jObject bugObject = bugFactory.addItem("");
With
Com4jObject bugObject = bugFactory.addItem(new Variant(Variant.Type.VT_NULL));

Another tip is formatting the date.
WARNING: HP Quality Center Plugin exception
com4j.ComException: 80040519 (Unknown error) : Invalid date field value. : .\invoke.cpp:517

DateFormat dateFormat = new SimpleDateFormat("dd/MM/yy");
Date date = new Date();
bug.field("BG_DETECTION_DATE", dateFormat.format(date));

The final tip is ensuring you use a user that exists on the system.
WARNING: HP Quality Center Plugin exception
com4j.ComException: 800403ff (Unknown error) : Dookie is not in the users list : .\invoke.cpp:517

bug.field("BG_DETECTED_BY", "this has to be a valid user");

It's not all good news. For the life of me I couldn't find a solution to the this one and didn't want to get too deeply into the whole DLL thing. No matter how I specified the DLL; jvm params, properties et al of how I registered them or indeed which version I used, I could not overcome the following error. If oyu have a fix, let me know please. The only way to circumnavigate it was to downgrade from a 64-bit to a 32-bit version of the application. So I can only assume there is an issue with com4j-amd64.dll or com4j-x64.dll
com4j.ExecutionException: com4j.ComException: 80040154 CoCreateInstance failed : Class not registered : .\com4j.cpp:153

Friday, 27 July 2012

CouchBase: Permission denied

It's 1400hrs, I have an hour or so to kill, so I going take some blog notes as I play with CouchBase. I must be having one of the those weeks where nothing is going to go well; thankfully we're almost at the end of the week.

I'm finally up and running with an instance of CouchBase (though I had to change OS and grab the latest build), and I can see buckets and documents.  Yay!  The next logical step for me is to connect programmatically, and maybe create a prototype app.

Let's watch the video as it will only take 5 minutes. I love the fact this it titled "Get Started in 5 Minutes" but the video is 11 minutes long...

To save you some time, download the driver and add it to your classpath; saved you 10 minutes and 32 seconds.

I believe a 'Hello, World!' program should demonstrate the simplest thing possible, so I just wanted to connect to the instance.

public static void main(String args[]) 
 throws Exception {

 URI server = new URI("http://192.168.0.8:8091/pools");
 ArrayList servers = new ArrayList();
 servers.add(server);
        
 CouchbaseClient client = new CouchbaseClient(servers, "default", "");
}


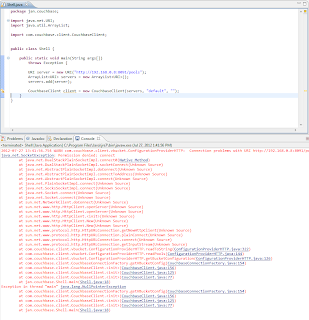
It looks to be failing due to a "Permission denied" exception.  FFS!  I'm starting to get slightly miffed. Running a quick wget indicates there should be no such permission issues.


Ah, ha!  Fortunately I've seen this before, it just took me moment for the old brain cells to remember. To fix the issue you need to add the follow as a VM param:
-Djava.net.preferIPv4Stack=true

Now that I can finally connect, let's get the KVPs from a bucket.   It looks like TAP is the way to go.

TapClient tc = new TapClient(servers, "default", "");
tc.tapDump("some id here");

tapDump returns a TapStream, but I can't find the TapStream dependency. This dude managed to find it, but looks like he may have other issues.

I'm getting bored, and my head is getting sore with all this brick wall hitting.  I know it's early, but I fancy a nice cold Never Mind The Anabolics, it's in a bottle so I don't have to worry about tap streams...

Oh, and it looks like my issue with installing on Win7 64-bit has been around a while.

Thursday, 26 July 2012

CouchBase: SIMPLE

So, yesterday we had the CouchBase guys in the office, I think it was some kind of retaliatory strike to me having brought in the MongoDB guys a few weeks prior.

In the interest of being able to form a balanced view I thought I'd test out the "SIMPLE" part of the CouchBase "SIMPLE, FAST, ELASTIC" tag line by downloading, installing, creating and query some data. I like simple so this looks like it was made for me.

It takes me only a minute or so to update the version of MongoDB I run on my Ubuntu servers; it is very simple, but I've done it few times, so some of the ease of update is simply down to practice. This isn't really going to be a 100% fair and direct comparison if I'm completely honest. However, for the purposes of comparison we can use a quick guide to downloading, installing, creating and query some data. All the information you need is on one, simple page.

MongDB
Download: 27 seconds
Unzip package: 4 seconds
Create data directory: 9 seconds
Start server: 19 seconds
Start shell: 16 seconds
Create a document: 16 seconds
Query collection: 8 seconds

Total time: About 2 minutes.

CouchBase
Download: 2 minutes, 31 seconds
Install: (via the Wizard) 2 minutes 52 seconds + 3 minutes (Had to run this a seconds time as I was shown a 1618 error saying install was already in progress, which it wasn't. Also, after the wizard said it had finished the install there was no CouchBase directory in the default location and a browser didn't pop up pointing to the Admin UI, as per the install guide)


Configure server: 1 minute. I wasn't sure how much RAM I should be dedicating to CouchBase, nor was I completely sure which bucket type I should be choosing. The other niggly things with the install were the fact I had to complete the product registration before I could complete the configuration.

I'm not sure what it's doing here tbh...


Start shell: No time recorded. I couldn't see a quick start, simple, single guide anywhere. I had to google "couchbase quick start guide" which initially took me to a page where I could request quotes around pricing and duration. Gave up after 10 minutes. Looks like I may have to do this via the Admin UI.

Insert data: No time recorded. As I couldn't find how to connect to the server via a shell, I hunted around and found this posting; it looks simple. I couldn't find the 'Document button' that was being referred to though. I hunted around for another 15-20 minutes until I got frustrated and bored. I gave up.


Total time: DNQ

I'm afraid CouchBase has failed my definition of simple. Maybe they use a different dictionary, or maybe I'm just too simple. If anyone can point me towards a one-pager, simple, 101, 'get started quickly guide', then I'd appreciate it.

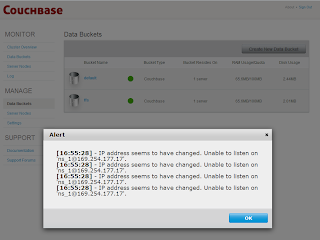
Let's give it another. So many people are using this that this must be a one off. So, I uninstall and restart my box. Then install afresh. I continue through the default settings. This time when I get to the Console I am met with this...


Not only can I not create a Document, I can barely use the Admin UI because of the modal alert that keeps popping up... FFS!

To get over this I do the following:
cd %COUCHBASE_HOME%\Server\bin
service_stop.bat
service_unregister.bat
Edit the script service_register.bat
Replace NS_NAME=ns_1@%IP_ADDR% with the 127.0.0.1.
service_register.bat
service_start.bat

Final effort. I uninstalled yet again and downloaded the latest version 2.0.0-dev-preview-4 and ran through the install process. Everything came unstuck when the wizard hit the 'Computing space requirements'; we basically hung at this stage. I wasn't able to cancel the install, so I had to kill the process. I tried once more and one last time - same result. There is a saying, 'If at first you don't succeed, try once more and give up.


UPDATE: 2012 Olympic Opening Day
$wget http://packages.couchbase.com/builds/1495/couchbase-server-community_x86_64_2.0.0-1495-rel.deb
$sudo dpkg -i couchbase-server-community_x86_64_2.0.0-1495-rel.deb

dependency error

$sudo apt-get install libssl0.9.8
$sudo dpkg -i couchbase-server-community_x86_64_2.0.0-1495-rel.deb


Now I can hit the Admin UI. I tap up 192.168.0.8:8091
We're getting there; I want to install some samples; I chose the beer sample, no surprise really. I was thrown back an error.


I hit next again and it said the sample was already installed. OK. So I unseleted the sample and hit next again. Success. So, semi-SIMPLE, it took less than 5 minutes; all I had to do was be careful about my choice of OS and grab the very latest build (-;


Thanks to Frank Weigel who pointed me at the latest build.

Initial thoughts are:
  1. it's weird not having the shell and doing everything via a web UI
  2. from the brief look at the beer sample, it looks to my uneducated eye that we are defining the functions by_key_value, by_location and brewery_beers in an almost utility helper class document.

Now may the time to go and find some 101 documentation (-;

Thursday, 19 July 2012

shell/mongo.js:91


Today I found some time to play with the new MongoDB aggregation framework.  It's not an official, stable release yet, but I'm not thinking about putting it into production just yet.

I wanted to keep the existing instance on MongoDB intact, so I installed it in it's own directory and created a new data directory to mirror this need.  These are the exact steps, if you're interested.

$wget http://www.mongodb.org/dr/fastdl.mongodb.org/linux/mongodb-linux-x86_64-2.1.2.tgz/download
$mv download mongodb-linux-x86_64-2.1.2.tgz
$tar -zxvf mongodb-linux-x86_64-2.1.2.tgz
$sudo mkdir -p /usr/lib/mongodb/2.1.2
$sudo mv mongodb-linux-x86_64-2.1.2/* /usr/lib/mongodb/2.1.2/
$rm -r mongodb-linux-x86_64-2.1.2
$sudo mkdir -p /data/db-2.1.2
$sudo chown `id -un` /data/db-2.1.2
$/usr/lib/mongodb/2.1.2/bin/mongod --dbpath /data/db-2.1.2 --logpath /data/db-2.1.2/mongod.log

Now crack open a new terminal so you can connect.

$cd /usr/lib/mongodb/2.1.2/bin
$./mongo
MongoDB shell version: 2.1.2
connecting to: test
Thu Jul 19 11:40:14 Error: couldn't connect to server 127.0.0.1:27017 src/mongo/ shell/mongo.js:91
exception: connect failed

Oh dear.  But this shows mongod is running:

$ps -ef | grep mongod
/usr/lib/mongodb/2.1.2/bin/mongod --dbpath /data/db-2.1.2 --logpath /data/db-2.1.2/mongod.log

What does the log say?

$less /data/db-2.1.2/mongod.log

...
Thu Jul 19 11:40:35 [initandlisten] waiting for connections on port 27017
...

Hmmm.  Let's try again.

$cd /usr/lib/mongodb/2.1.2/bin
$./mongo

Hmmm, now it's connecting.  Well, I'm off to play with the aggregation framework now and I'll check this anomaly later.

The time now is 1625hrs and it looks like 2.2.0-rc0 has just been released.  Let's give that a go.

$wget http://www.mongodb.org/dr/fastdl.mongodb.org/linux/mongodb-linux-x86_64-2.2.0-rc0.tgz/download
$mv download mongodb-linux-x86_64-2.2.0-rc0.tgz
$tar -zxvf mongodb-linux-x86_64-2.2.0-rc0.tgz
$sudo mkdir -p /usr/lib/mongodb/2.2.0-rc0
$sudo mv mongodb-linux-x86_64-2.2.0-rc0/* /usr/lib/mongodb/2.2.0-rc0/
$rm -r mongodb-linux-x86_64-2.2.0-rc0
$sudo mkdir -p /data/db-2.2.0-rc0
$sudo chown `id -un` /data/db-2.2.0-rc0
$/usr/lib/mongodb/2.2.0-rc0/bin/mongod --dbpath /data/db-2.2.0-rc0 --logpath /data/db-2.2.0-rc0/mongod.log

Crack open a new terminal so you can connect.

$cd /usr/lib/mongodb/2.2.0-rc0/bin
$./mongo
MongoDB shell version: 2.2.0-rc0
connecting to: test
Thu Jul 19 16:33:41 Error: couldn't connect to server 127.0.0.1:27017 src/mongo/shell/mongo.js:91
exception: connect failed

Is it running?

$ps -ef | grep mongod
/usr/lib/mongodb/2.2.0-rc0/bin/mongod --dbpath /data/db-2.2.0-rc0 --logpath /data/db-2.2.0-rc0/mongod.log

Yes, it is.  Bugger, I can't connect.  Let's take a look at the log again.

$less /data/db-2.2.0-rc0/mongod.log

...
Thu Jul 19 16:33:29 [initandlisten] journal dir=/data/db-2.2.0-rc0/journal
Thu Jul 19 16:33:29 [initandlisten] recover : no journal files present, no recovery needed
Thu Jul 19 16:33:31 [initandlisten] preallocateIsFaster=true 31.64
Thu Jul 19 16:33:33 [initandlisten] preallocateIsFaster=true 30.5
Thu Jul 19 16:33:37 [initandlisten] preallocateIsFaster=true 30.52
Thu Jul 19 16:33:37 [initandlisten] preallocateIsFaster check took 8.333 secs
Thu Jul 19 16:33:37 [initandlisten] preallocating a journal file /data/db-2.2.0-rc0/journal/prealloc.0
Thu Jul 19 16:33:40 [initandlisten]             304087040/1073741824    28%
Thu Jul 19 16:33:43 [initandlisten]             482344960/1073741824    44%
Thu Jul 19 16:33:46 [initandlisten]             650117120/1073741824    60%
Thu Jul 19 16:33:49 [initandlisten]             817889280/1073741824    76%
Thu Jul 19 16:33:52 [initandlisten]             985661440/1073741824    91%
Thu Jul 19 16:33:56 [initandlisten] preallocating a journal file /data/db-2.2.0-rc0/journal/prealloc.1
Thu Jul 19 16:33:59 [initandlisten]             272629760/1073741824    25%
Thu Jul 19 16:34:02 [initandlisten]             398458880/1073741824    37%
Thu Jul 19 16:34:05 [initandlisten]             555745280/1073741824    51%
Thu Jul 19 16:34:08 [initandlisten]             723517440/1073741824    67%
Thu Jul 19 16:34:11 [initandlisten]             912261120/1073741824    84%
Thu Jul 19 16:34:17 [initandlisten] preallocating a journal file /data/db-2.2.0-rc0/journal/prealloc.2
Thu Jul 19 16:34:20 [initandlisten]             304087040/1073741824    28%
Thu Jul 19 16:34:23 [initandlisten]             471859200/1073741824    43%
Thu Jul 19 16:34:26 [initandlisten]             629145600/1073741824    58%
Thu Jul 19 16:34:29 [initandlisten]             796917760/1073741824    74%
Thu Jul 19 16:34:32 [initandlisten]             964689920/1073741824    89%
Thu Jul 19 16:34:37 [initandlisten] waiting for connections on port 27017
Thu Jul 19 16:34:37 [websvr] admin web console waiting for connections on port 28017
Thu Jul 19 16:34:56 [initandlisten] connection accepted from 127.0.0.1:48357 #1 (1 connection now open)
Thu Jul 19 16:35:30 [conn1] end connection 127.0.0.1:48357 (0 connections now open)

Well, there you have it.  It's pretty clear.  It takes just over a minute between mongod starting up and it being ready for connections.

Top tip
Be patient young Jedi.  Mongo is quick, but give it a moment to get out of bed and put on it's dressing gown between ringing the doorbell and banging on the door.